25 September 2023
The Story of the Battle of St. Quentin Canal
On 29 September 1918, British, Australian, and American troops stormed the St. Quentin Canal in one of the most dramatic actions of the Hundred Days Offensive. Discover the story of the battle here.
The Battle of the St. Quentin Canal
What was the Battle of St. Quentin Canal?

Image: St. Quentin Canal, 1918, Herbert Hughes-Stanton (Art.IWM ART 1998)
The Battle of St. Quentin Canal was a pivotal offensive carried out by British, Australian, and United States forces during the First World War’s Hundred Days Offensive.
The offensive’s goal was to capture and cross the St. Quentin Canal, which wound its way through the battlefields of Northern France at the time of the Great War.
For the Imperial German defenders facing the arrayed Allied troops, the canal formed a ready-made section of their Hindenburg Line defences.
Its capture is considered one of the British and Australian’s finest military feats of the war and ultimately hastened the defeat of Imperial Germany.
The Hundred Days Offensive
The Hundred Days Offensive, also known as the Advance to Victory, refers to a period of sustained Allied advancement and pressure along the Western Front.
Drawing in forces from across the British Empire, France, Belgium, and the United States, the Hundred Days was a huge effort, with millions of men fighting on both sides.
Casualties were heavy and the going tough, but by November 11th, 1918, th
e Imperial German Army’s will to fight had essentially been broken.
Battles like the crossing of the St. Quentin Canal were key to penetrating and crushing German defences, and indeed the Battle of St. Quentin is recognised as one of the most important actions of the Advance to Victory.
Who fought in the Battle of St. Quentin Canal?
As mentioned earlier, the action at St. Quentin was fought by a multi-national force.
British, Australian, and American units were involved, organised as part of the British Fourth Army commanded by General Sir Henry Rawlinson, although it was Australian Lieutenant General Sir John Monash who took command of the operations on the ground.
Around 32 Allied divisions, including 30 from the British Empire and two American Divisions (the 27th and 30th) were assembled to assault St. Quentin. Essentially, that’s over half a million men from around the world.
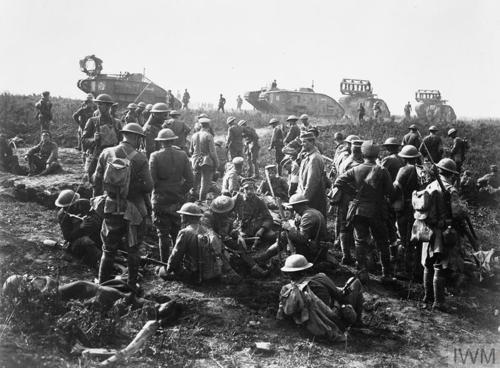 Image: Troops of the US 30th Division with British tanks during the Battle of the St. Quentin Canal (© IWM Q 9365)
That said, not all the Divisions at St. Quentin took part in the fighting as discussed in more detail later.
Facing them were some 39 German Divisions. By this point of the war, the Imperial German Army was not the same force that nearly broke the Allies at the start of the conflict.
The Spring Offensives, one last major German offensive designed at knocking Britain out of the war, had bled Germany of its crack troops. Replacing them were young, inexperienced recruits.
German morale was also starting to sag. The effects of the British naval blockade of German ports were starting to bite at home, whereas the relentless pressure the Allies were exhibiting at the Front was starting to take its toll on the German soldiers.
However, despite being haggard and tired, the German defenders were not knocked out yet.
General Monash’s battle plan
 Image: Lieutenant General Sir John Monash (Wikimedia Commons)
General Monash was initially aghast that his Aussies would be in the frontline yet again at St. Quentin.
Since the start of the Hundred Days Offensive in August 1918, the Australian Corps had firmly in the spearhead, smashing through enemy lines at a terrific pace – but also at a terrific cost. They were tired and many Aussies were beginning to show the strain.
Monash was pleased to learn the American II Corps of the 27th and 30th Divisions was at his disposal, assigning them as the vanguard instead of his Australians.
Monash had been an engineer by trade and used this mode of thinking to inform his battle plans.
For Monash, crossing the St. Quentin Canal would be “more a matter of engineering and organisation than fighting” – although the two would meet for devastating effect during the battle to come.
Despite this, Monash’s plan was relatively simple:
- The Americans would breach the Hindenburg Line while the 3rd and 5th Australian Divisions would exploit the breakthrough
- The attack would be launched at Vendhulle through the Bellicourt Tunnel: a 5,000-metre passageway converted into an integral part of the Hindenburg Line
- To the west, of the canal, British III and IX Corps would attack the German trench system to support the main assault
Before the operation began, Rawlinson made one tweak to the plan: IX Corps would attack directly across the deep canal cutting south of Bellicourt tunnel.
Monash himself was opposed to this, with the change stemming from British IX Corps Commander Lieutenant General Sir Walter Braithwaite.
For Monash, this added unnecessary additional risk to an operation civilian leaders back in Britain were wary of.
The German defenders regarded the cutting as impregnable but in the end, the 46th (North Midland) Division was tasked with tackling the cutting.
Preliminary actions in the St. Quentin Sector
While the Australian division had captured the southern part of the staging area, the north sector remained in German hands.
On 27 September, an American-led assault on three German strongpoints was launched. It was not a success.
The inexperienced but enthusiastic US troops were without adequate command. Only 18 officers were available across 12 companies due to others being trained elsewhere.
The failure had knock-on effects on the main assault on the St. Quentin Canal.
As a result of the confusion caused by the failed attack, Allied commanders had to forgo the traditional pre-battle artillery barrage ahead of the US 27th Division’s attack on the 29th.
Rawlinson had petitioned Allied High Command to delay the attack but was rebuked. Supreme Allied Commander Ferdinand Foch demanded constant pressure thus the assault continued as planned.
29 September 1918: The assault on the St Quentin Canal begins
Attacking Bellicourt Tunnel

Image: Australian infantry move into action as the Battle of St. Quentin Canal commences (© IWM Q 9367)
In the early hours of 29 September, British guns let fly largest British artillery bombardment of the war.
In short order, 1,600 guns fired close to a million shells, battering German forward positions. New fuses for the high explosive shells hurled at opposition lines cleared great swathes of barbed wire, clearing the way in several important areas.
Despite this, the creeping barrage that was customary for supporting infantry attacks was missing on the American 27th Division’s position, leaving the men vulnerable in the assault’s early stages.
Their goal was to capture a defensive position known as the Le Catelet-Nauroy Line to the east of the Canal. After the Americans had taken this, the Australian 3rd and 5th Divisions would leapfrog their US counterparts and push on further and break German defences near Bellicourt.
The American attack did not go well. The 27th Division attacked without its protective barrage and ended up in scattered, leaderless bands. A literal fog of war had descended on this part of the battlefield too, further confusing the American assault, leaving them vulnerable to machine-gun fire.
Rather than coming to relieve and leapfrogging their US comrades, the Australian 3rd and 5th Divisions were deployed to bring the attack to a successful conclusion.
This infuriated Monash as he had planned to protect his Australian units, which had already been fighting for basically all of August and September, for follow-up actions.
It would take four days of fierce-close quarter fighting before the Australians and Americans captured the Le Catelet-Nauroy Line.

Image: Australian and US troops meet at the Bellicourt tunnel having crossed the St. Quentin Canal (© IWM Q 9524)
Despite these setbacks in the north, the US 30th Division performed well and managed to cross the canal and breach the Hindenburg line. Because of 30th Division’s success, the Australian 5th Division swept past and captured the village of Bellicourt.
Assaulting the Canal Crossing
To the south, British troops of IX Corps were coming across tough resistance as they attempted to traverse St. Quentin's canal banks, bridges, and plunging river crossings.
The geography and engineering of the canal essentially turned it into a ready-made defensive position for the Imperial German Army. As well as the canal itself, the German strongpoint was a nest of trenches, machine-gun posts, field guns, and tank traps.
In the vanguard of the British attack was the 46th Division. It was up to them to cross the deep canal cutting and cross it properly with the goal of capturing important high ground around the villages of Lehaucourt and Magny-la-Fosse.
More leapfrogging was planned with the 32nd Division following the 46th in to push the advance on.

Image: The Riqueval Bridge over the St. Quentin Canal 1920 (© IWM Q 37249)
Unlike the 27th US Division, the British troops were screened by a creeping artillery barrage, pinning their opponents back into their trenches and dugouts.
Remember how Monash suggested the assault on the St. Quentin Canal would be as much a matter of engineering than fighting? No more was this the case than when the Royal Engineers supplied various flotation devices to aid the advancing troops, including the construction of many improvised floating piers.
One important incident was the capture of Riqueval Bridge. Rigged to blow, the bridge was captured at a speed that took its German occupants completely by surprise. Captain A.H. Charlton led the men of the 1/6th Battalion of the North Staffordshire Regiment swept the defenders aside and captured the bridge intact.
The 46th Division ended the 29th of September having taken Bellenglise. They had captured 70 guns and some 4,200 captives for the loss of 800 men.
Exploiting the space captured by the 46th, the 32nd Division followed in good order and was over the canal in force by nightfall.
Supporting attacks from the British 1st Division aimed at protecting the 46th’s flank, met with tough opposition. Despite this, they managed to push through the German defences and capture the Le Tronquoy Tunnel.
The 1st and 32nd Divisions were able to link up, effectively giving the British Fourth Army control of the St. Quentin Canal.
An operation that had many in Whitehall wondering if the British had the resources to pull off had ended in a success.
Who won the Battle of St. Quentin Canal?

Image: Brigadier-General John Vaughan Campbell VC addressing men of the 137th Brigade (46th Division) on the Riqueval Bridge (© IWM Q 9535)
The Battle of the St. Quentin Canal was an overwhelming Allied success.
The capture of such an important location provided a huge advantage. Imperial Germany had lost yet another defence line and by 2 October, the British and Australian soldiers pushing on from St. Quentin had punched a hole straight through the formidable Hindenburg Line.
In morale terms, the St. Quentin victory was seismic. German morale was approaching breaking point but with the canal now in Allied hands, it was becoming clear to German High Command the war was unwinnable.
It would not be long until the November 11 Armistice – but there was still just over a month of tough, desperate fighting to come before the guns could fall silent on the Western Front.
Casualties of St. Quentin
As with any major Great War action, the capture of the St. Quentin Canal resulted in mass casualties and deaths.
British and Australian casualties and losses are estimated over 10,000 killed, captured, missing, or wounded.
The US units involved took around 13,000 casualties. German figures are harder to pin down although as many as 36,000 prisoners were taken captive.

Lieutenant William Richard Haigh
Image: Australian War Memorial
William Richard Haigh worked as a town clerk prior to enlisting, he embarked from Sydney aboard HMAT Star of England on 8 March 1916.
In recognition of his outstanding leadership at Westhoek, Belgium, he was awarded the Military Cross on 27 October 1917.
He was severely gassed, on 4 October 1918 during the battle at St Quentin Canal, France and transferred to England where he died on 26 November 1918 in the London General Hospital, Wandsworth, aged 30. He is buried in the Brookwood Military Cemetery, United Kingdom.

Second Lieutenant Maxwell Barrows
Image: IWM
Second Lieutenant Maxwell Dalston Barrows, 5th Lieutenant Barrows was the only son of a Nottingham family and was awarded scholarships at Sedbergh School and Pembroke College, Oxford.
He received his commission in August 1917 and was posted to the Western Front the following month with the 5th Battalion, Sherwood Foresters (Nottinghamshire and Derbyshire Regiment).
Maxwell served as adjutant from April to August 1918 and was awarded the Military Cross.
He was killed in action, aged 20, whilst commanding E Company during the Battle of St Quentin Canal on 3 October 1918, just five weeks before the end of the First World War.
Lieutenant Maxwell Barrows is today buried at Bellicourt British Cemetery.
Where are the war dead of the Battle of St. Quentin commemorated?
Casualties from the St. Quentin engagement are commemorated in various cemeteries and memorials across Northern France, including:

Bellicourt British Cemetery
Many of the war graves at Bellicourt British Cemetery hold casualties from the North Midland and Australian divisions involved in the fighting to capture Bellicourt and Nauroy around the St. Quentin Canal.
The cemetery was started shortly after the fighting, originally holding 73 burials. After the war, casualties were bought in from nearby cemeteries and Bellicourt was expanded.
Now, the cemetery holds just over 1,200 Commonwealth burials of the First World War.

Vis-en-Artois Memorial
This Vis-En-Artois Memorial bears the names of over 9,000 men who fell in the period from 8th of August 1918 to the date of the Armistice in the Advance to Victory in Picardy and Artois, between the Somme and Loos, and who have no known grave.
They belonged to the forces of Great Britain and Ireland and South Africa; the Canadian, Australian and New Zealand forces being commemorated on other memorials to the missing.
Discover more stories with the Commonwealth War Graves Commission
Our search tools can help you discover the cemeteries and memorials commemorating Commonwealth casualties of the Battle of St Quentin Canal.
Use our Find Cemeteries & Memorial search function to find all our sites in France and Belgium.
To search in more detail, use our Find War Dead tool and additional field filters, including date of death and country of burial, to locate the casualties in our.
What stories will your search uncover?